Flask - Part 6
26 Sep 2018 · 5 min read
Introduction
This version_6 will show you how to add roles to your users.
Setting up
To begin we will start from our previous version_5 app. If you don’t have it anymore, no worries, simply copy the reference code.
# assuming you're in flask_learning
cp -R flask_cybermooc/version_5 my_app_v6
cd my_app_v6
and initialize our venv :
# assuming you're in flask_learning/my_app_v6
virtualenv venv -p python3
source venv/bin/activate
# (venv)
pip install -r requirements.txt
All set up ? let’s begin.
1 - Roles
Roles are a crucial part in an application. You can apply the principle of least privilege, eg. every new user has no role. You can also create a role-based permission management and add capabilities (view-X, edit-X, delete-X).
1.1 - Declaring the role model
Let’s define our model in app/models/role.py.
# assuming you're in flask_learning/my_app_v6 (venv)
touch app/models/role.py
and code our role model :
# app/models/role.py

from .base import Base
from ..database import db

class Role(Base):

    __tablename__ = 'roles'

    name = db.Column(db.String(80), unique=True)
    description = db.Column(db.String(255))

    def __eq__(self, other):
        return (self.name == other or
                self.name == getattr(other, 'name', None))

    def __ne__(self, other):
        return not self.__eq__(other)
Here we declare a model Role, that will create the roles table in the DB. A role has a name and a description. We also declare the buil-in methods __eq__ and __ne__ that will allow us to easily compare 2 roles.
1.2 - Declaring our assocation table
Now that our Role model is declared, we can create our association table, for the relationship many-to-many between users and roles : models/association.py :
# app/models/association.py
# http://docs.sqlalchemy.org/en/latest/orm/extensions/declarative/basic_use.html

from ..database import db

user_roles = db.Table('user_roles',
        db.Column('user_id', db.Integer, db.ForeignKey("users.id")),
        db.Column('role_id', db.Integer, db.ForeignKey("roles.id")))
And then add a field in our User model to easily manage its roles :
# app/models/user.py
# http://docs.sqlalchemy.org/en/latest/orm/extensions/declarative/basic_use.html

from .association import user_roles
from .role import Role
from .base import Base
from ..bcrypt import bc
from ..database import db


class User(Base):

    __tablename__ = 'users'

    username = db.Column(db.String, nullable=False, unique=True)
    email = db.Column(db.String, nullable=False, unique=True)
    encrypted_password = db.Column(db.String, nullable=False)

    roles = db.relationship(Role, secondary=user_roles,
                            backref=db.backref('users', lazy='dynamic'))

    def has_role(self, role):
        if isinstance(role, str):
            # if role is the name of the role and not the object
            return role in (role.name for role in self.roles)
        else:
            return role in self.roles

    def set_password(self, password):
        self.encrypted_password = bc.generate_password_hash(password)

    def verify_password(self, password):
        return bc.check_password_hash(self.encrypted_password, password)
- line 16 : with sqlalchemy, we can declare a field that will be populate by this many-to-many relationship.
It gives us a
listof Roles, handy to.appendetc…backref(meaning ‘back-reference’) is used to automaticaly create a field in the Role model.
1.3 - Updating the cli
As we created new models, we need to import them in our cli :
# app/cli.py

import click
from flask.cli import with_appcontext
from .database import db
from .models.association import user_roles
from .models.user import User
from .models.role import Role


@click.command('reset-db')
@with_appcontext
def reset_db_command():
    """Clear existing data and create new tables."""
    # run it with : FLASK_APP=. flask reset-db
    reset_db()
    click.echo('The database has been reset.')

[...]
1.3 - Update unit test
Let’s update our database unit test in test_1_database.py :
# tests/test_1_database.py

from app.database import db

def test_db_tables(client):
    assert len(db.metadata.sorted_tables) == 3
    tables = ["users", "roles", "user_roles"]
    assert all(table in [t.name for t in db.metadata.sorted_tables] for table in tables)
1.4 - Testing
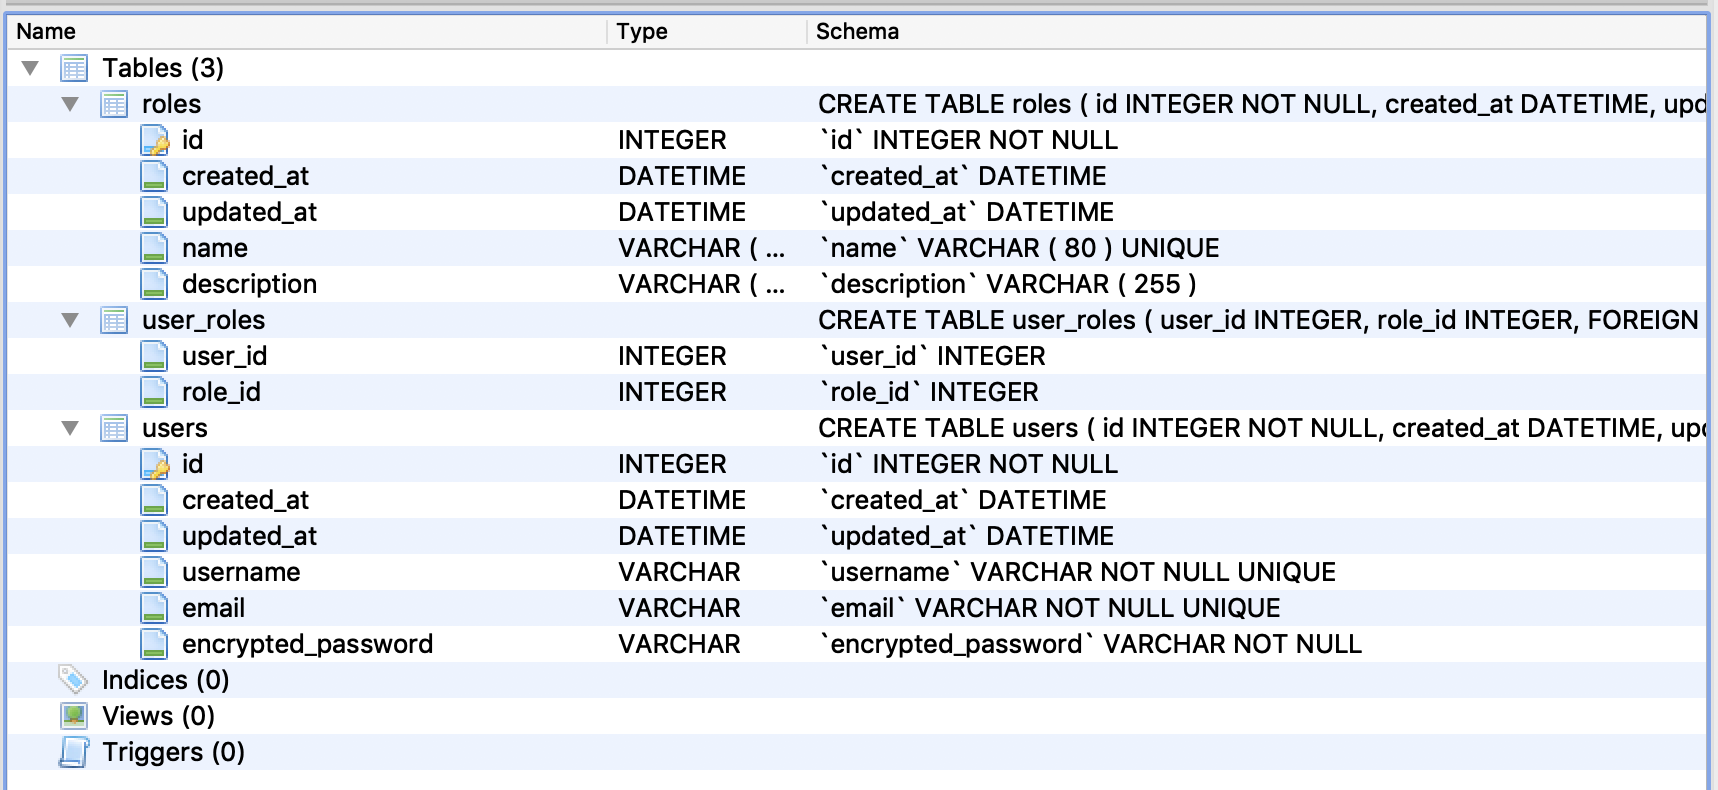
Let’s see if the tables roles, users and user_roles are created.
# assuming you're in flask_learning/my_app_v6 (venv)
flask reset-db
flask run

Yep, our tables were created :-)
2 - Creating our first admin
Now that we have roles, it would be useful to create an admin role and an admin user.
2.1 - Adding our command
To do so, we will create a command (just like reset-db).
So let’s add this command to cli.py :
# app/cli.py

import click
from flask.cli import with_appcontext
from .database import db
from .models.role import Role
from .models.user import User

[...]

@click.command('create-admin')
@click.argument('username')
@click.argument('email')
@click.argument('password')
@with_appcontext
def create_admin_command(username, email, password):
    # run it with : flask create-admin 'XXX' 'YYY' 'ZZZ'
    admin_role = Role.query.filter(Role.name == "admin").first()
    if admin_role is None:
        admin_role = Role()
        admin_role.name = "admin"
        admin_role.description = "the admin role duh."
        db.session.add(admin_role)
    if User.query.filter(User.username == username).first() is not None:
        return click.echo("username already taken")
    if User.query.filter(User.email == email).first() is not None:
        raise click.echo("email already signed-up")
    new_user = User()
    new_user.username = username
    new_user.email = email
    new_user.set_password(password)
    new_user.roles.append(admin_role)
    db.session.add(new_user) # update the user roles
    db.session.commit()
    return click.echo(username + " was created with admin role.")


def cli_init_app(app):
    app.cli.add_command(reset_db_command)
    app.cli.add_command(create_admin_command)
2.2 - Updating our unit test
In tests/conftest.py we will add a function to create an admin to use later in our tests.
# tests/conftest.py

import pytest
from dotenv import load_dotenv
load_dotenv()

from app import create_app
from app.database import db
from app.cli import reset_db


@pytest.fixture(scope="session")
def global_data():
    return dict()


@pytest.fixture(scope="session")
def client():
    # setup
    test_app = create_app()

    from os import environ as env
    test_app.config['SQLALCHEMY_DATABASE_URI'] = "sqlite:///test.sqlite"
    test_app.config['TESTING'] = True
    client = test_app.test_client()

    with test_app.app_context():
        reset_db()
        create_admin("testadmin", "testadmin@mail.com", "testadmin")

    yield client

    # teardown
    with test_app.app_context():
        pass
        #drop_db()

def create_admin(username, email, password):
    from app.models.role import Role
    from app.models.user import User
    admin_role = Role()
    admin_role.name = "admin"
    admin_role.description = "the admin role duh."
    db.session.add(admin_role)
    new_user = User()
    new_user.username = username
    new_user.email = email
    new_user.set_password(password)
    new_user.roles.append(admin_role)
    db.session.add(new_user) # update the user roles
    db.session.commit()
And we also add a test to login as an admin, to get the token back in tests/test_3_login_route.py :
# tests/test_3_login_route.py

[...]

def test_login_admin(client, global_data):
    correct = client.post("/api/v1/login", json={
        'username': 'testadmin', 'password': 'testadmin'
    })
    assert correct.status_code == 200
    json_data = correct.get_json()
    assert "token" in json_data
    global_data['token_admin'] = json_data['token']
2.3 - Testing this command
Let’s run our app :
# assuming you're in flask_learning/my_app_v6 (venv )
flask create-admin 'root' 'root@mail.com' 'toor'

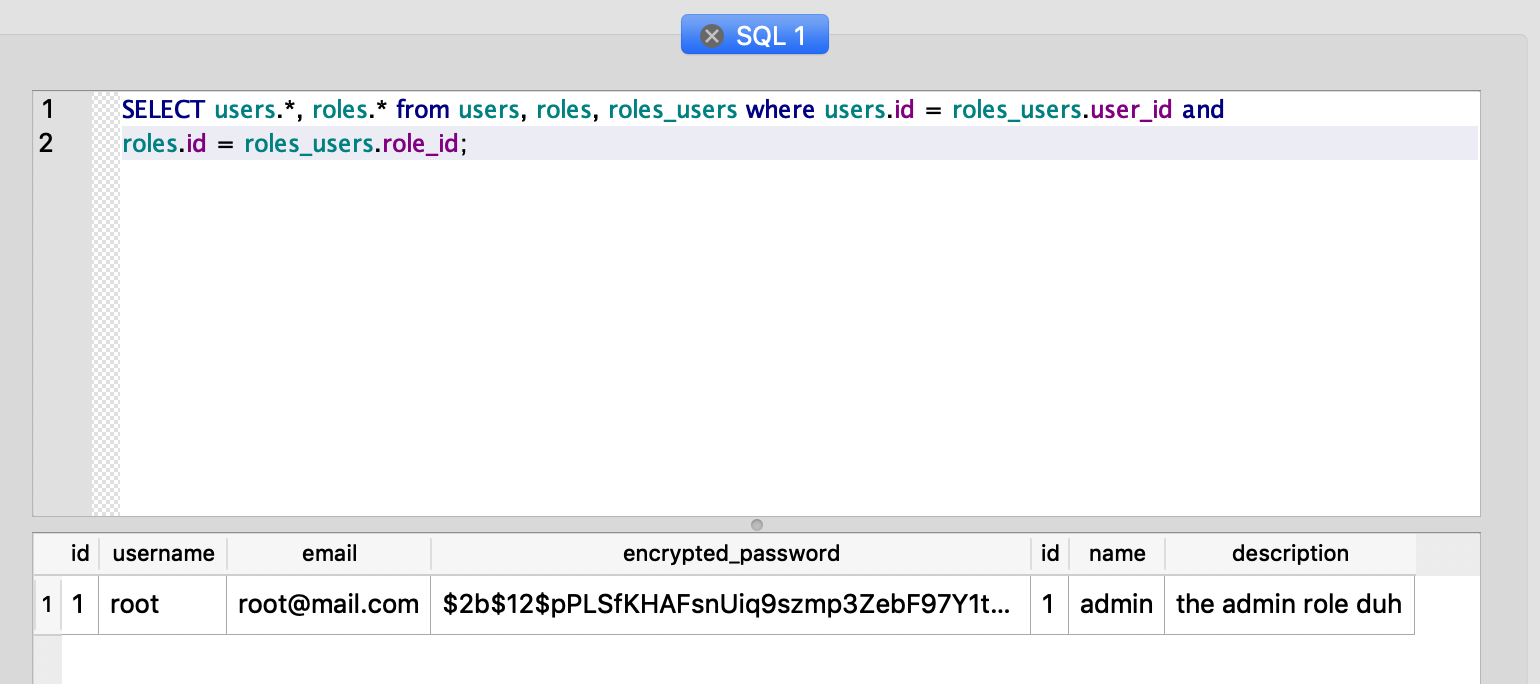
And let’s check our database :

All good :-)
Conclusion
If you’re stuck or don’t understand something, feel free to drop me an email / dm on twitter / a comment below. You can also take a look at flask_learning/flask_cybermooc/version_6 to see the reference code. And use run.sh to launch it.
Otherwise, congratulations ! You just learned how to create roles, adding them to the users and to create a cli command to add a user.
You’re now ready to go to part 7 to see how to protect some routes to only allow access to certain roles.
