
Flask - Part 3
23 Sep 2018 · 7 min read
Introduction
This version_3 will teach you how to connect your app with a database via SQLAlchemy and how to declare your models.
Setting up
To begin we will start from our previous version_2 app. If you don’t have it anymore, no worries, simply copy the reference code :
# assuming you're in flask_learning
cp -R flask_cybermooc/version_2 my_app_v3
cd my_app_v3/app
and initialize our venv :
# assuming you're in flask_learning/my_app_v3
virtualenv venv -p python3
source venv/bin/activate
# (venv)
pip install -r requirements.txt
1 - SQLAlchemy
SQLAlchemy is a python ORM. If you don’t know what an ORM is, here’s a pretty rought exaplanation. AN ORM is an object representation of your database. A python object (eg. a ‘User’) represents a table in your database. It allows you to use methods like ‘get’, ‘query’, ‘first’ instead of writing pure SQL.
1.1 - Installing SQLAlchemy
Let’s install flask_sqlalchemy which contains sqlalchemy + a wrapper for flask.
And we don’t forget to update our requirements.txt.
# assuming you're in flask_learning/my_app_v3 (venv)
pip install flask-sqlalchemy
pip freeze > requirements.txt
1.2 - Adding SQLAlachemy to our app
It is a good idea to keep the SQLAlchemy object instance in a separate file, to avoid circular imports.
Let’s create a file for our SQLAlchemy instance
# assuming you're in flask_learning/my_app_v3 (venv)
touch app/database.py
and declare our database
# app/database.py

from flask_sqlalchemy import SQLAlchemy

db = SQLAlchemy()
Wen can now import db in the application_factory __init__.py :
# app/__init__.py
# application factory

from flask import Flask

def create_app():
    app = Flask(__name__)
    app.config['SQLALCHEMY_DATABASE_URI'] = 'sqlite:///db.sqlite'
    app.config['SQLALCHEMY_TRACK_MODIFICATIONS'] = False

    from .database import db
	db.init_app(app)

    from .api_v1 import root_blueprint
    app.register_blueprint(root_blueprint)

    return app
A couple of new things going on here :
- line 7 : in order to connect to the database, SQLAlchemy will look for
SQLALCHEMY_DATABASE_URIinside the configuration of the app. Here we hard-code the url and choose to use asqlitedatabase with the namedb.sqlite(more about hard-coding this kind of information in a minute) - line 9 : we import our SQLALchemy instance and initialize our app with it.
nota bene: you should never hard-code the URL of the database in your code, this is a bad practice.
- why ? (not safe, not practical, bad pattern)
- if you commit your code on a public repository, everyone can see it. Here it’s a simple sqlite, but if you choose to host your database on amazon web-services, you gonna have a bad time
- you can’t easily test your app. If you want to have a test database, a development database and a production database, you can’t easily change it.
- you can’t easily change your database url. you need to dive into the code and find the corresponding line.
- because.
- so, what should I do ?
- you should use an environment variable, it could be a file loaded when the app starts (
.env) or a config file (config.py) that won’t be commited. - when you deploy an app on heroku for example, heroku gives you the URL of the database via through an environment variable.
- you should use an environment variable, it could be a file loaded when the app starts (
1.3 - Fixing hard-coded information
Let’s update our structure.
# assuming you're in flask_learning/my_app_v3 (venv)
pip install python-dotenv
pip freeze > requirements.txt
We install python-dotenv because flask needs it to automaticaly load .env files.
Speaking about .env, let’s create it :
# assuming you're in flask_learning/my_app_v3 (venv)
touch .env
and add our data in it :
DATABASE_URL=sqlite:///db.sqlite
and update our application factory app/__init__.py :
# app/__init__.py
# application factory

from flask import Flask

def create_app():
    app = Flask(__name__)

    from os import environ as env
    app.config['SQLALCHEMY_DATABASE_URI'] = env.get('DATABASE_URL')
    app.config['SQLALCHEMY_TRACK_MODIFICATIONS'] = False

    from .database import db
	db.init_app(app)

    from .api_v1 import root_blueprint
    app.register_blueprint(root_blueprint)

    return app
Much better :-)
We can also create a file called .flaskenv where we put every flask variable, so we don’t need to write them everytime we want to run our app.
FLASK_RUN_PORT=5000
FLASK_RUN_HOST=0.0.0.0
FLASK_APP=wsgi.py
FLASK_ENV=development
2 - Adding models
Now that SQLAlchemy is imported, let’s add our models (tables).
For this flask course, I would like to create a bootstrap application that you can re-use each time you start a new flask project. 99% of the time (* number made up) your app will need users, login/signup etc…
Let’s create a models folder
# assuming you're in flask_learning/my_app_v3 (venv)
mkdir app/models
Thank’s to python multiple inheritance (it has nothing to do with mutiple inheritance but I just wanted to show you), we can declare a Base model that we will import everytime we need the same fields in a Model. Creating a Base model allows us to write DRY code.
# assuming you're in flask_learning/my_app_v3 (venv)
touch app/models/base.py
and we declare our Model :
# app/models/base.py

from ..database import db


class Base(db.Model):

    __abstract__ = True

    id = db.Column(db.Integer, primary_key=True)
    created_at = db.Column(db.DateTime,
                    default=db.func.current_timestamp())
    updated_at = db.Column(db.DateTime,
                    default=db.func.current_timestamp(),
                    onupdate=db.func.current_timestamp())
and now we create a file for our User model :
# assuming you're in flask_learning/my_app_v3 (venv)
touch app/models/user.py
and we declare this model :
# app/models/user.py
# http://docs.sqlalchemy.org/en/latest/orm/extensions/declarative/basic_use.html

from .base import Base
from ..database import db


class User(Base):

    __tablename__ = 'users'

    username = db.Column(db.String, nullable=False, unique=True)
    email = db.Column(db.String, nullable=False, unique=True)
    encrypted_password = db.Column(db.String, nullable=False)
User model will inherit from Base (and db.Model via Base) so it will have id, created_at, updated_at fields.
__tablename__ is optional but I strongly recommend setting it because with weird class names it’s quite hard to know the final table name.
3 - Generating the database
SQLAlchemy will generate the database and the tables based on our code. But we need a way to trigger this event.
You could choose to reset the database everytime your app restarts, but it’s gonna lead to troubles.
We will rather use the command-cli provided by Flask. (and it’s an excuse for me to show you how to use the cli).
Let’s create a file called cli.py that will host all our commands.
# assuming you're in flask_learning/my_app_v3 (venv)
touch app/cli.py
# app/cli.py

import click
from flask.cli import with_appcontext
from .database import db

# import every model here
from .models.user import User

@click.command('reset-db')
@with_appcontext
def reset_db_command():
    """Clear existing data and create new tables."""
    # run it with : FLASK_APP=. flask reset-db
    reset_db()
    click.echo('The database has been reset.')


def reset_db():
    db.drop_all()
    db.create_all()


def cli_init_app(app):
    app.cli.add_command(reset_db_command)
Here, we declare a click.command that will drop-then-create all the tables. That’s why we need to import every model.
Now that we declared our command, we need to import it into our application factory aka __init__.py via cli_init_app.
# app/__init__.py
# application factory

from flask import Flask

def create_app():
    app = Flask(__name__)

    from os import environ as env
    app.config['SQLALCHEMY_DATABASE_URI'] = env.get('DATABASE_URL')
    app.config['SQLALCHEMY_TRACK_MODIFICATIONS'] = False

    from .database import db
    db.init_app(app)

    from .cli import cli_init_app
    cli_init_app(app)

    from .api_v1 import root_blueprint
    app.register_blueprint(root_blueprint)

    return app
We are now ready to test our brand new app.
4 - Testing
Let’s run our new command
# assuming you're in flask_learning/my_app_v3 (venv)
flask reset-db
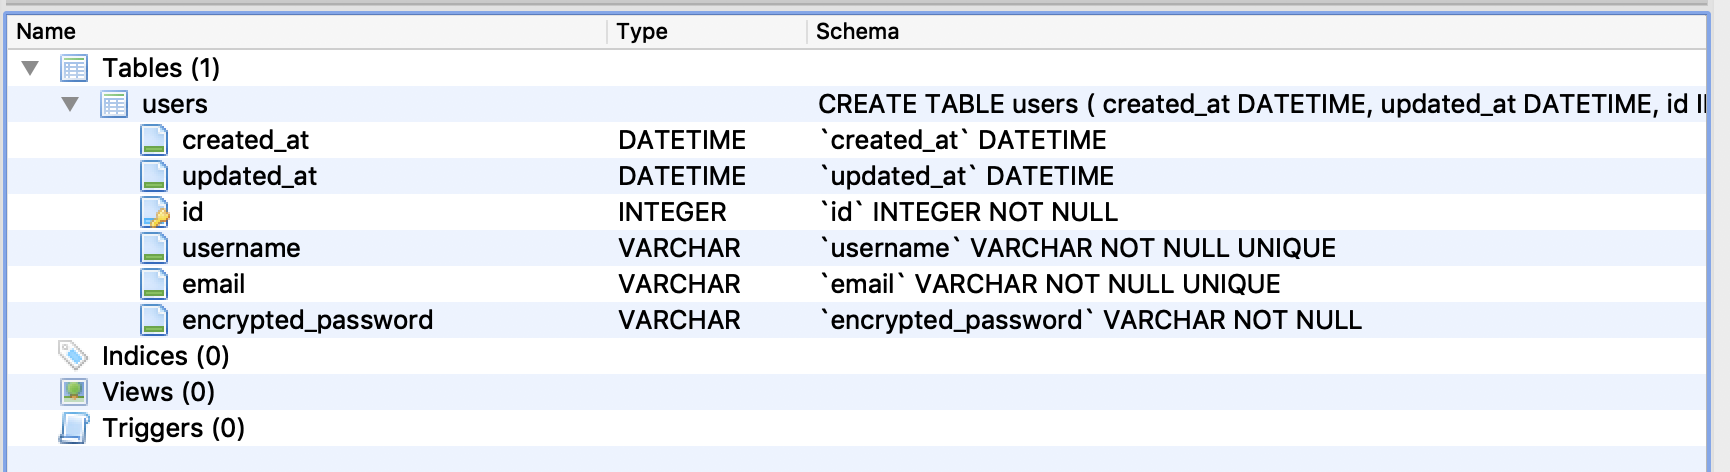
If the command succeeds, a db.sqlite file should appear in the app folder
To make sure that our databse was correctly created, we can inspect it via a database browser.
For SQLite, a great tool is sqlite-browser.
4.1 - Unit testing
Let’s update our tests/conftest.py file to add the database:
# tests/test_basic.py

import pytest
from dotenv import load_dotenv
load_dotenv()

from app import create_app
from app.database import db
from app.cli import reset_db

@pytest.fixture(scope = 'session')
def global_data():
    return dict()

@pytest.fixture(scope="session")
def client():
    test_app = create_app()

    from os import environ as env
    test_app.config['SQLALCHEMY_DATABASE_URI'] = "sqlite:///test.sqlite"
    test_app.config['TESTING'] = True
    client = test_app.test_client()

    with test_app.app_context():
        reset_db()

    yield client
we run the tests python -m pytest tests/ ; test.sqlite was created and the test passed.
Let’s add a file to test the tables in the database test_1_database.py :
# tests/test_basic.py

from app.database import db

def test_db_tables(client):
    assert len(db.metadata.sorted_tables) > 0
    assert "users" in [table.name for table in db.metadata.sorted_tables]
Conclusion
If you’re stuck or don’t understand something, feel free to drop me an email / dm on twitter / a comment below. You can also take a look at flask_learning/flask_cybermooc/version_3 to see the reference code. And use run.sh to launch it.
Otherwise, congratulations ! You just learned how to connect a database to your app. But our app is quite useless right now, isn’t it ?..
Don’t worry, if you understood everything, you’re now ready to go to part 4 to see how to add a signup, login and roles to your users !